Sugar and spice, and all things nice…

12 Nov

Soooo, given that this blog is called Cupcakes and Glitter, I thought I had better get on with making some cupcakes with glitter..!

I was a bit bored this evening, and decided to dig out a recipe that I’ve had my eye on for a while now – Sticky toffee cupcakes with salted caramel frosting. However, I didn’t have any dates, and I couldn’t be faffed to go out and get some so I decided that I would adapt the recipe slightly to use up some apples I had instead. I peeled and chopped a couple of apples and then cooked them gently over a low heat for ten minute or so with some mixed spice and some dark brown sugar. I also added 1/2 teaspoon of cinnamon to the cake batter, used soft light brown sugar instead of muscavado and just made plain caramel frosting. I found the recipe to be easily adaptable, and I had no problems with anything.

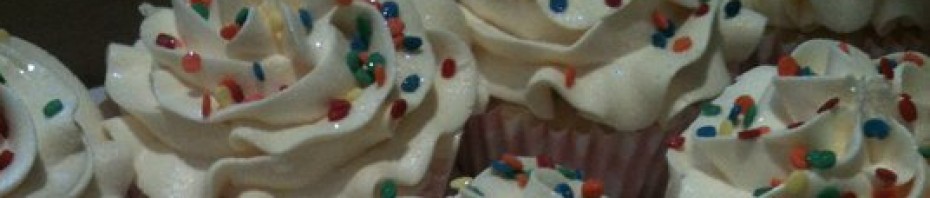
Cupcakes + day 1 of a new diet don’t really mix, unfortunately, but I had a tiny bite of the one I gave to my chief tester Mr H, and we both really liked it. The apple and the cinnamon made the cupcake every so slightly muffin-y almost. I decided that I would tart the cakes up a bit at the end, so I tried making some spun sugar to decorate them with (inspired by the wonderful Sprinkle Bakes) and I’d like to think I did pretty well for a first attempt! It was a lot easier than I thought it would be, so give it a go. And of course, there was glitter (though not that visible in the rubbish iPhone pics…)

Here’s the original recipe – I can’t wait to try it out!

Sticky toffee cupcakes with salted cream caramel

Ingredients

* 180 g dates, pitted and chopped
* 1 tsp vanilla extract
* 180 g self-raising flour
* 1 tsp bicarbonate of soda
* 80 g unsalted butter
* 150 g muscovado sugar
* 2 eggs, lightly beaten

For the caramel

* 125 g caster sugar
* 80 ml double cream
* 1/2 tsp salt
* 1 tsp vanilla extract

For the buttercream

* 1/2 tsp salt
* 1 tsp vanilla extract
* 160 g butter
* 200 g icing sugar

Method

1. Preheat the oven to 180ºC/fan170ºC/gas 4.

2. Place the paper cases into a 12 hole cupcake tin.

3. In a heatproof bowl, pour 180ml boiling water over the dates and leave to soak for 20 minutes. with a fork, gently break up the dates and stir in the vanilla.

4. Sift the flour and bicarbonate of soda into a bowl and set aside. Cream together the butter and sugar for a good 5 minutes until very light and fluffy.  Add the eggs gradually, beating between each addition, slipping in 1 tbsp flour about halfway through to prevent curdling.
Lastly, fold in the remaining flour and then the date mixture.

5. Spoon into the cupcake cases and bake for 15–20 minutes (the tops should spring back when pressed with a finger). Remove and leave to cool.

6. For the caramel –  Dissolve the sugar and 60ml water in a small, solid-based pan over a gentle heat, then increase the heat to a boil. Wait a few minutes, leaving the pan undisturbed but watching it like a hawk and, as soon as it changes to a wonderful caramel colour (like strong tea) and is thicker, remove immediately from the heat, stand well back, and add the cream.

7. Be very careful as it is searing hot and it may splatter a little. It will react, or ‘seize’, and you may think it has gone wrong; it hasn’t. Keep stirring, adding the salt and the vanilla. Leave until stone cold.


8. If using shop bought caramel sauce, such as dulce de leche simply mix it with the salt and vanilla.

9. For the buttercream –  Cream the butter and icing sugar for at least 5 minutes with an electric mixer and add the caramel or the dulce de leche.


10. Put the buttercream into the piping bag fitted with the star nozzle and pipe it on to the cakes, or spread it on with a palette knife.

11. Decorate  however you like (that’s me, not Good Food!)


All packaged up to be sent off with Rich to take to work, so I can’t be tempted AND I get brownie points for being a good wife! Genius!


Bringing it back…Black Forest Gateau

3 Nov

It seems to be that, generally speaking, Black Forest Gateau is regarded as being very 70’s and highly unfashionable. It’s one of those desserts that is always stocked in a supermarket freezer cabinet, all soggy cake and faux cream. Bleurgh.

But, when made properly and freshly, it is an absolute *dream* dessert (I know it’s a cake, but it’s very much a pudding cake) and so simple to make. It also happens to be my husband’s favourite cake (although every cake seems to be his favourite cake…) so he was pretty pleased when I told him that I would be making Black Forest Gateau a few weeks ago. Sadly for him, it was for our neighbour’s birthday, but I don’t think that he will need to wait long to have some – I absolutely adore the combination of cherries and chocolate, so now I just need a decent excuse to indulge so that I can make it again!

I tend to find that my first port of call when looking for classic recipes is the wonderful Delia Smith, in particular her Complete Cookery Course book, and this time was no exception. Her recipe contains no flour, which makes it great for anyone followng a gluten-free diet.

Black Forest Gateau

Ingredients

~ 6 large eggs
~ 5 oz/150g caster sugar
~ 2 oz/50g good quality cocoa powder, sifted (Green & Blacks cocoa powder is wonderful)

For the filling and topping

10 fl oz/275ml double cream
1 level tabespoon caster sugar
1lb/450g tin or jar morello cherries
1-2 tablespoons kirsch or rum
2 oz/50g plain chocolate

Method

~ Pre-heat the oven to gas mark 4/180c and then oil and line two 8″ (20cm) sandwich tins.

~ Start by separating the eggs and placing the whites in a clean grease-free bowl. Put the yolks in another bowl and whisk them with the caster sugar until they just begin to pale and thicken. Be careful not to thicken them too much.

whisking eggs with sugar

thickened eggs & sugar

~ Now fold in the sifted cocoa powder

~ Next with a clean whisk, beat the egg whites until stiff but not too dry.  Stir a heaped tablespoon of the egg white into the chocolate mixture to loosen it up a bit.  Then, using  a metal spoon, carefully and gently fold in the rest of the egg white (trying not to lose any air).

~ Divide the mixture equally into the prepared sandwich tins and bake them near the centre of the oven for about 15-20 minutes.  They won’t appear to be cooked exactly, just set and slightly puffy.  When you take them out of the oven they will shrink, but that’s normal. Leave the cakes to cool in the tins, but turn them out while they’re still faintly warm and strip off the base papers.

~ Now whip the cream with the  tablespoon of caster sugar until it is a floppy, spreadable consistency.

whipping the cream

~ Next empty the tin of cherries into a sieve set over  bowl and combine 2 tablespoons of the juice with the Kirsch or rum.  Sprinkle this over the cake layers and, using a palette knife, spread about a third of the whipped cream over one cake.

halved cherries

~ Then slice the cherries in half.  Leave about a dozen whole cherries for the decoration.  Now arrange the sliced cherries all over the cake spread with cream.

~ Next, carefully place the other cake on top and cover the entire cake with the remaining cherries.  Carefully place the other cake on top and cover the entire cake with the remaining cream.

~ Finish off by arranging the whole cherries around the edge, then finely grate the chocolate and sprinkle it all over the cake.


Gluten-free baking *guest post*

27 Oct

Just to get a little introduction out of the way – this is a ‘guest writer’ appearance by Rachel’s youngest brother, Andrew. I will be doing a guest post on the mysterious subject of gluten-free baking and will share with you some of my experiences about this little-explored subject.

I myself, am relatively new to gluten-free cooking and baking. As a classically trained chef, I am familiar with techniques and recipes that tend to use a lot of wheat flour and with that comes gluten. As such, the idea of coming up with methods for creating things such as gluten-free cupcakes appealed to me; any chance to broaden my horizons and skill set is something that I actively pursue. I happen to know some very dear people that are gluten/wheat intolerant and any chance to devise and scheme on their behalf is a challenge I want to take on.

I’m going to get the scientific part out of the way (apologies for this part…) The main obstacle facing coeliacs and those pursuing a gluten-free diet is the reliance on plain and self-raising flours used in traditional recipes. Plain and self-raising flour that are made from wheat contain gluten and so an alternative has to be sought for gluten-free baking. Unfortunately – gluten is the all important composite that lends elasticity and texture to our traditional baked goods. It also helps foods to rise by trapping air; it acts as a sort of flexible web, allowing our cupcake batter to rise and take on that wonderful shape. So if we can’t use the magical properties that gluten lend, how do we effectively replicate/mimic it?

Fortunately, cake batters don’t require a lot of gluten. Eggs, sugar and butter/margarine all help to aid moisture and flavour in our recipes. When sugar and butter are creamed together, air bubbles are trapped.  With the addition of egg yolks which help to emulsify fats, you can hold a lot of moisture in suspension in your mix without the aid of gluten.

But one complaint about gluten-free baking is that it is hard to get that same texture and ‘mouthfeel’ that you can get with regular wheat flour.

It’s all about getting the right mix of gluten-free flours to help mimic the characteristics of wheat flour. I’ve often seen recipes that call for mixes of cornflour, potato flour, tapioca flour, rice four, soy flour, maize flour…and the list sometimes goes on… A good base flour to use is brown rice flour, which isn’t dense or gritty. You could mix and match with cornflour or potato flour for example. The possibilities for experimentation are endless 🙂

Supermarkets are now carrying a greater selection of flours and gluten-free products. Glycerine can be added to batter mixes to help with moisture retention and thus texture. I have experimented with glycerine and the results don’t vary a huge deal. But, anything that helps right…? The same goes for Xanthan gum; it is used in gluten-free baking to aid the texture of the crumb. I have used it in a bread recipe once and it did an okay job. It’s more needed for bread making than cupcakes though, as bread needs strong, developed gluten to help achieve the texture that bread should have.

The first time I used a gluten-free flour combo, I simply substituted my normal self-raising wheat flour and I kept all the other variables such as eggs, butter and sugar, the same. I have to say that I was really, really impressed with the results. I was looking for noticeable differences in taste, texture and aroma; of these, only the aroma was different. Even then it was a very small difference, only ever so slightly ‘savoury.’ Most impressive for me was the achieved texture; this particular gluten-free flour mix was able to mimic that crumbly, moist texture that wheat flour gives. In a ‘blind’ taste test – 4 out of 4 family members could not tell the difference. And bear in mind these 4 subjects have been accustomed to baked goods with gluten in them for donkeys years!

Fresh from the oven...

This trial batch was sent away on the very same day to some relatives in Cardiff who promptly ate them all, without noticing that they were gluten-free. I kept a couple behind just to see how they would hold up after a day or so.

Two days later, these little hotcakes were still holding up okay. One of them even got blitzed in the microwave by grandma and survived. Until she ate it.

So there you have it. Gluten-free baking is no more technical than ordinary baking, really. It’s about the right mix of flours and trying to mimic what ordinary wheat flour does. As long as you experiment and find a good mix of flours, gluten-free cupcakes can be just as successful as the ‘normal’ ones…

Looks just like a 'normal' cupcake.

At the end of the day, any kind of cupcake is better than no cupcake, right?

Easy peasy, lemon squeezy…

18 Oct

My wonderful mother-in-law has a recipe for the most delicious and easy lemon cheesecake you will ever make, and she very kindly gave it to me so that I could make a pudding to take to a dinner tomorrow night. You can throw it together in about 20 mins, and then you leave it to chill for a few hours, or preferably overnight, making it an incredibly fuss free dessert that’s perfect for making ahead of time. Be warned though, as it’s REALLY easy to eat a lot of this in an very short space of time…

Lemon Cheesecake

Ingredients

4 large lemons
2 tins condensed milk, regular or light
1 pint double cream
6oz/170g ginger biscuits
2oz/55g butter

You will also need a 9″ springform tin

Method

~ Crush the ginger biscuits finely (I put the biscuits in a bag and then bashed them with a rolling pin, but you could use a food processor. Not as good for stress relief, but a bit less messy!)
~ Melt the butter and stir in the crushed biscuits. Transfer this mixture to the tin and spread evenly over the base, pressing gently.
~ Finely grate the zest of the lemons and squeeze the juice into a jug (about 7fl oz or so)
~ Pour the condensed milk into a large bowl and slowly whisk in the double cream, stirring constantly.
~ Continue to whisk, and add the lemon juice and zest to the bowl in a steady stream – the mixture will change dramatically when you do this, and will become really thick as you whisk.
~ Pour the lemon mixture over the biscuit base, and smooth the top. Refrigerate until set, preferably over night.

And that’s it! Impressive results for minimal effort.

P.S. I couldn’t resist showing off our latest kitchen gadget. It’s amazing.

Rach xxx

Cupcakes and the City

15 Oct

My most recent batch of cupcakes were for the Rock My Wedding meet in London, last Friday, for any readers and sponsors. For those of you who don’t know, Rock My Wedding is literally the BEST. SITE. EVER. for anything wedding related. I follow it religiously! I thought I would be cheeky and ask if they would like any cupcakes for the event, and to my surprise they said yes!

Cue much excitement, and then head scratching as I pondered what cupcakes to make! In the end, and after much debate with Mr H (who pointed out that I had to get 50 odd cupcakes up to London, and bake them all in one day, and should therefore probably keep it simple..) I decided that I would make vanilla cupcakes with vanilla buttercream frosting, and lemon cupcakes with lemon buttercream frosting, and then fancy them up with some gorgeous decoration.

At the last minute, I decided to make the lemon frosting almond-lemon, with the addition of sweet almond extract, something I’ve never tried before. The almond flavour really complemented the cake, and the lemon juice and zest in the frosting gave it a wonderful lift and stopped the topping from being too sweet.

For the vanilla cupcakes, I decided to decorate them in the RMW colours and style – baby blue polka dot! I used baby blue polka dot cases, and piped swirls of white frosting with blue edges, and topped with pearl dragees.

For the lemon cupcakes, I wanted to do something really bright and fun. I used purple cases and coloured the icing a pale yellow. I then topped them with rainbow sequins and ‘disco violet’ edible glitter. Be warned, it gets everywhere!!

I was so pleased with how they turned out. Luckily my brother Andrew agreed to be my assistant for the day, and very kindly helped me negotiate the London Underground with 6 boxes of cakes!

Definitely worth the effort, as they went down a treat. I love baking for others – it’s the best feeling seeing someone enjoy something you’ve made.

Until next time!

Rach xxx

Rach Bakes….

15 Oct

I’m a bit late to this party, but eh, who cares!

As you can most probably tell from the title of this blog, I love cupcakes. Oh, and glitter. Actully I love baking any kind of cake, but especially cupcakes.

Athough I’ve been cooking and baking sweet treats for friends and family for years,  I’ve recently been asked to provide cakes for various upcoming celebrations and it seemed like the perfect opportunity to expand my hobby a little!

I’d love to be able to expand and really give it a go, so it made sense to start a blog so I can share the cakes I’m baking and the recipes I’m trying and creating. I’ll probably try to post a few non-cake/baking related recipes as well, just for fun. I do love my food!

If you’re looking for cakes and cupcakes for birthdays and other celebrations, or just something to enjoy anytime, then please get in touch – I’d love to hear from you!

That’s all for now folks – wish me luck!

Rach xxx